Showing posts with label MySQL L1. Show all posts

Aug 1, 2024

Mysql Replication

MySQL database servers (slave)-


I/O thread and SQL Thread-


Replication I/O threads- 

When a start slave statement is issued on a replica server, the replica creates an I/O thread, which connects to the source and asks it to send the updates recorded in its binary logs. The replication I/O thread reads the updates that the source's Binlog Dump thread sends and copies them to local files that comprise the replica's relay log.

The state of this thread is shown as Slave_IO_running in the output of show slave status.


Replication SQL threads-

The replica creates an SQL thread to read the relay log that is written by the replication I/O thread and execute the transactions contained in it.

There are three main threads for each source/replica connection. A source that has multiple replicas creates one binary log dump thread for each currently connected replica, and each replica has its own replication I/O and SQL threads.


Binary log dump thread-

The source creates a thread to send the binary log contents to a replica when the replica connects. This thread can be identified in the output of show process list on the source as the Binlog Dump thread.

The binary log dump thread acquires a lock on the source's binary log for reading each event that is to be sent to the replica. As soon as the event has been read, the lock is released, even before the event is sent to the replica.


Step 1-

Login to the database and check the global variable gtid.


Step 2-

To Check the server id and binary logfile.


Step 3-  

Open the MySQL configuration file and config.

Gtid_mode=ON

enforce_gtid_consistency=ON

server id=100

log-bin=gtidsource


Step 4 –

Restart MySQL service.


Step 5-

Now check global variable gtid, server_id and binary log.


Step 6-

Create a user in master.

Create user repl@’%’ identified by ‘Rainbow@123’


Step 7-

check global variable gtid in replica.


Step 8-

Check server_id and binary_log in replica.


Step 9-

Now check replica status.


Step 10-

Change Master to master user.


mysql> change master to  master_user='repl',master_password='Secure@321’, master_host='192.168.0.195',master_auto_position=1,get_master_public_key=1;

Query OK, 0 rows affected, 8 warnings (0.02 sec)


mysql> start replica;

Query OK, 0 rows affected (0.01 sec)


mysql> show replica status \G

*************************** 1. row ***************************

Replica_IO_State: Waiting for source to send event

Source_Host: 192.168.0.195

Source_User: repl

Source_Port: 3306

Connect_Retry: 60

Source_Log_File: gtidsource.000003

Read_Source_Log_Pos: 157

Relay_Log_File: clota-dbl06-relay-bin.000002

Relay_Log_Pos: 375

Relay_Source_Log_File: gtidsource.000003

Replica_IO_Running: Yes

Replica_SQL_Running: Yes

Replicate_Do_DB:

Replicate_Ignore_DB:

Replicate_Do_Table:

Replicate_Ignore_Table:

Replicate_Wild_Do_Table:

Replicate_Wild_Ignore_Table:

Last_Errno: 0

Last_Error:

Skip_Counter: 0

Exec_Source_Log_Pos: 157

Relay_Log_Space: 591

Until_Condition: None

Until_Log_File:

Until_Log_Pos: 0

Source_SSL_Allowed: No

Source_SSL_CA_File:

Source_SSL_CA_Path:

Source_SSL_Cert:

Source_SSL_Cipher:

Source_SSL_Key:

Seconds_Behind_Source: 0

Source_SSL_Verify_Server_Cert: No

Last_IO_Errno: 0

Last_IO_Error:

Last_SQL_Errno: 0

Last_SQL_Error:

Replicate_Ignore_Server_Ids:

Source_Server_Id: 100

Source_UUID: 25474780-4a56-11ef-b77c-000c2926dc41

Source_Info_File: mysql.slave_master_info

SQL_Delay: 0

SQL_Remaining_Delay: NULL

Replica_SQL_Running_State: Replica has read all relay log; waiting for more updates

Source_Retry_Count: 86400

Source_Bind:

Last_IO_Error_Timestamp:

Last_SQL_Error_Timestamp:

Source_SSL_Crl:

Source_SSL_Crlpath:

Retrieved_Gtid_Set:

Executed_Gtid_Set: 89ffa9fd-4a4c-11ef-8d4a-000c2995d827:1-4

Auto_Position: 1

Replicate_Rewrite_DB:

Channel_Name:

Source_TLS_Version:

Source_public_key_path:

Get_Source_public_key: 1

Network_Namespace:

1 row in set (0.00 sec)


Step 11-

After enabaling gtid.


Step 12-

Create a database and check the global variable gtid.


Step 13-

Check server_uuid.


Step 14-

Change database and check global variable gtid in replica.


Step 15-

 In replica use f1 database and check the table.


Jul 29, 2024

Install MySQL 8 on Oracle Linux

Installing MySQL on Oracle Linux is simple and straightforward. Download the latest version of MySQL based on your OS version.

Download via Command Line (optional):

Use wget or curl to download the file directly if you prefer using the command line

wget https://downloads.mysql.com/archives/get/p/23/file/mysql-8.0.30-linux-glibc2.12-x86_64.tar.xz


Change to the directory where you downloaded the tarfile:

cd  /test

Extract the tarfile using tar:

tar -xvf mysql-8.0.30-linux-glibc2.12-x86_64.tar.xz


Now Please install all the package Step by Step :

Step 1 :Install mysql-commercial-common

yum install mysql-commercial-common-8.0.32-1.1.el9.x86_64.rpm

Step 2 :Install mysql-commercial-client-plugins

yum install mysql-commercial-client-plugins-8.0.32-1.1.el9.x86_64.rpm

Step 3 :Install mysql-commercial-libs

yum install mysql-commercial-libs-8.0.32-1.1.el9.x86_64.rpm

Step 4 :Install mysql-commercial-client

yum install mysql-commercial-client-8.0.32-1.1.el9.x86_64.rpm

Step 5 :Install mysql-commercial datafile

yum install mysql-commercial-icu-data-files-8.0.32-1.1.el9.x86_64.rpm

Step 6 :Install MySQL server:

yum install mysql-commercial-server-8.0.32-1.1.el9.x86_64.rpm


Start and enable the MySQL service:

 systemctl start MySQL

 systemctl enable MySQL

Run the Mysql_secure_installation script to secure your installation:

mysql_secure_installation

Check MySQL Status verify that MySQL is running:

systemctl status MySqld


Access MySQL connect to MySQL using the root account:

mysql -u root –p

Check the temporary password for MySQL:

grep 'temporary password' /var/log/mysqld.log

/usr/bin/mysql_secure_installation

Securing the MySQL server deployment:

Enter password for user root: <enter temp password>

The existing password for the user account root has expired. Please set a new password.

New password: <give new password>

Re-enter new password: <re-enter new password>

Connect to MySQL and check the databases:

mysql  -u root  -p

password ******


mysql> show databases;


Jun 25, 2023

My SQL Innodb Cluster Setup

Server List

clota-dbl05 

@@version 8.0.32-commercial

192.168.0.156

My SQL root password Secure@123

-------------------------------------------------------------------

ota-dbl06 <cota-dbl06>

@@version 8.0.33

192.168.0.197

My SQL root password Secure@123

-------------------------------------------------------------------

clota-dbl07

192.168.0.195

@@version @@version 8.0.33

My SQL root password Secure@321

-------------------------------------------------------------------

Step 1: 
Modify /etc/hosts with IP and server_name  on all the nodes...

Like below 

vim /etc/hosts
192.168.0.156   clota-dbl05
192.168.0.197      ota-dbl06
192.168.0.195   clota-dbl07

Open DB Port on all the nodes...
firewall-cmd --add-port={3306}/tcp --permanent
firewall-cmd --reload

Step 2: 
Create a DB user allow remote connection on all the 3 nodes.

create user 'i3'@'%' IDENTIFIED BY 'Secure@123';
grant all privileges on *.* to i3;

create user 'i3'@'%' IDENTIFIED BY 'Secure@123';
grant all privileges on *.* to i3;

GRANT CLONE_ADMIN, CONNECTION_ADMIN, CREATE USER, EXECUTE, FILE, GROUP_REPLICATION_ADMIN, PERSIST_RO_VARIABLES_ADMIN, PROCESS, RELOAD, REPLICATION CLIENT, REPLICATION SLAVE, REPLICATION_APPLIER, REPLICATION_SLAVE_ADMIN, ROLE_ADMIN, SELECT, SHUTDOWN, SYSTEM_VARIABLES_ADMIN ON *.* TO 'i3'@'%' WITH GRANT OPTION;
GRANT DELETE, INSERT, UPDATE ON mysql.* TO 'i3'@'%' WITH GRANT OPTION;
GRANT ALTER, ALTER ROUTINE, CREATE, CREATE ROUTINE, CREATE TEMPORARY TABLES, CREATE VIEW, DELETE, DROP, EVENT, EXECUTE, INDEX, INSERT, LOCK TABLES, REFERENCES, SHOW VIEW, TRIGGER, UPDATE ON mysql_innodb_cluster_metadata.* TO 'i3'@'%' WITH GRANT OPTION;
GRANT ALTER, ALTER ROUTINE, CREATE, CREATE ROUTINE, CREATE TEMPORARY TABLES, CREATE VIEW, DELETE, DROP, EVENT, EXECUTE, INDEX, INSERT, LOCK TABLES, REFERENCES, SHOW VIEW, TRIGGER, UPDATE ON mysql_innodb_cluster_metadata_bkp.* TO 'i3'@'%' WITH GRANT OPTION;
GRANT ALTER, ALTER ROUTINE, CREATE, CREATE ROUTINE, CREATE TEMPORARY TABLES, CREATE VIEW, DELETE, DROP, EVENT, EXECUTE, INDEX, INSERT, LOCK TABLES, REFERENCES, SHOW VIEW, TRIGGER, UPDATE ON mysql_innodb_cluster_metadata_previous.* TO 'i3'@'%' WITH GRANT OPTION;

flush privileges;


Test Connection:

mysql -u i3 -h DB_Server --socket=/var/lib/mysql/mysql.sock -p


Step 3: 
Bind IP Address and update the port
Update my.cnf with below parameter...
bind-address=0.0.0.0
port=3306


Step 4: 

MySQL Shell Installation 

# yum install mysql-shell

On clota-dbl05 
dba.configureInstance('i3@192.168.0.196:3306');

On ota-dbl06 
dba.configureInstance('i3@192.168.0.197:3306');


On clota-dbl07 
dba.configureInstance('i3@192.168.0.195:3306');


Step 5: 
Create Cluster

shell.connect('i3@192.168.0.196:3306');


var cluster =dba.createCluster('ProdCluster')


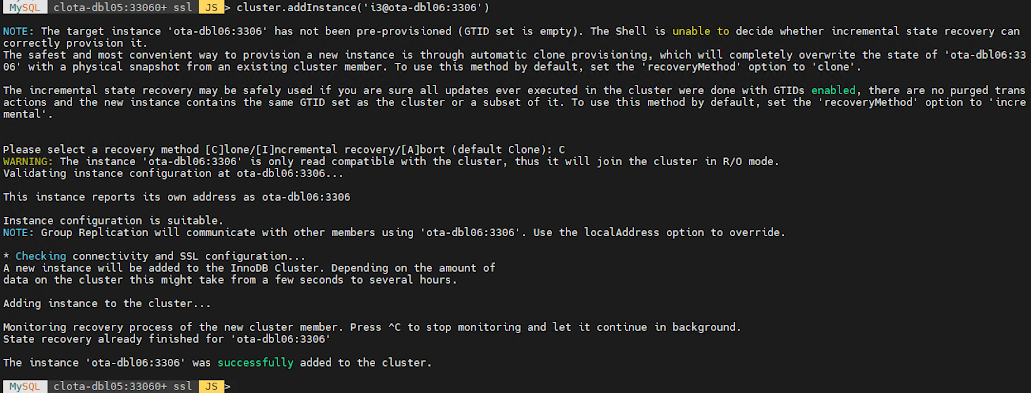
Cluster.addInstance('i3@192.168.0.197:3306')


Cluster.addInstance('i3@192.168.0.195:3306')


cluster.status()


cluster.describe()


select MEMBER_HOST,MEMBER_PORT,MEMBER_STATE,MEMBER_ROLE,MEMBER_COMMUNICATION_STACK,MEMBER_VERSION from replication_group_members;


Connect to Cluster Using Shell

# mysqlsh

MySQL  JS > shell.connect('i3@clota-dbl05:3306')


var cluster = dba.getCluster();

cluster.getName()

cluster.status();


Failover DB:

JS> shell.connect('clusteradmin@db1:3306');
JS> var cluster = dba.getCluster('ProdCluster')
JS> cluster.setPrimaryInstance('db1:3306');


Nov 5, 2022

Win OS Related Quick Commands

 Find Who Restarted Windows Server

--Run the following command to filter the System Logs with Source as User32.

Get-EventLog -LogName System | Where Source -eq User32


--You may also filter the system logs with Event ID 1074 with the following command.

Get-EventLog -LogName System | Where EventID -eq 1074


Oct 27, 2022

Read a big file using PowerShell

# Command-Format: Get-Content 'your-file-path' -Tail <number-of-line>

Get-Content '.\mylargefile.txt' -Tail 5000 # Get-Content D:\MyBigFeedFile.txt | Select-Object -skip 123798766555672 -first 6

Sep 24, 2022

Index in MySQL

Index Info...

SELECT DISTINCT     TABLE_NAME, INDEX_NAME,COLUMN_NAME, index_type FROM INFORMATION_SCHEMA.STATISTICS WHERE TABLE_SCHEMA ='thinklouder_optimization';

SHOW INDEXES FROM table_name IN database_name;

------------------------------------------------------

OPTIMIZE TABLE tbl; 

will rebuild the indexes and do ANALYZE; it takes time.

------------------------------------------------------

ANALYZE TABLE tbl; 

is fast for InnoDB to rebuild the stats. With 5.6.6 it is even less needed.

------------------------------------------------------

Read the article 

https://www.thegeekstuff.com/2016/04/mysql-optimize-table/


Jul 3, 2022

Deterministic and Nondeterministic Functions

Deterministic functions:

Deterministic functions always result in the same output every time they are called with a fixed set of input values and given the same condition of the database. 

For example, AVG() function always results the same result given the qualifications stated above.

Nondeterministic functions:

Nondeterministic functions result in different output each time they are called with a fixed set of input values even if the database state that they access remains the same. 

For example, GETDATE() function, results the current date and time value, always a different value.


Consider a statement that deletes one hundred rows of a one-thousand-row table with no ORDER BY clause. If the rows are ordered differently between source and replica, you may delete a different one hundred rows on each, leading to inconsistencies.


Jun 27, 2022

Out of Memory Killer in Linux OS

In Linux systems, MySQL generally has a concept called Out of Memory killer OOM controlled by the kernel. This is to prevent the possible runaway process in OS to avoid race conditions and a server crash. 

Since MySQL and its optimized memory buffers are memory hogs, the OS may often kill the mysqld process to avert a system-wide crash if not adjusted. 

We can control how much memory MySQL should allocate from the operating system. 

Still, if OOM kicks in, it’s possible to configure on system level or altogether disable it.

$ pidof mysqld

35043

$ sudo cat /proc/35043/oom_score

34

$ sudo echo -100 > /proc/34643/oom_score_adj

$ sudo cat /proc/24643/oom_score

0

May 24, 2022

MySQL master - slave replication setup


 Hi guys, I hope you are doing great. Today here I am going to explain about MySQL master – slave replication setup.

For the setup I have two servers clota-labl01 and clota-labl02. Here on clota-labl01 I am going to setup master and clota-labl02 as slave DB.

Connect master server…

++++++++++++++++++++

clota-labl01

++++++++++++++++++++


my.cnf configuration…

=================

[mysqld]

server-id=100

bind-address=192.168.0.158

log_bin=mysql-bin

datadir=/var/lib/mysql

socket=/var/lib/mysql/mysql.sock

log-error=/var/log/mysqld.log

pid-file=/var/run/mysqld/mysqld.pid

relay-log=/var/log/mysql_slave/relay-bin

## "relay-log" is only for slave. We can skip if the server is serving as primary.


Note: log_bin parameter, enables binary logging. With binary logging enabled, the server logs all statements that change data to the binary log, which is used for backup and replication. The binary log is a sequence of files with a base name and numeric extension


Backup dump creation…

mysqldump -u root -p --source-data=2 -f  i3 > /tmp/i3_final_bkp__111.sql


create a user for replication…

Create USER 'repl'@'%' IDENTIFIED WITH mysql_native_password BY 'Lucknow@123';

GRANT REPLICATION SLAVE ON *.* TO 'repl'@'%';


Check master position..

mysql> show master status \G

*************************** 1. row ***************************

        File: mysql-bin.000002

        Position: 3230

                                Binlog_Do_DB:

                                Binlog_Ignore_DB:

                                Executed_Gtid_Set:


Connect Slave Server

++++++++++++++++++++

clota-labl02

++++++++++++++++++++

my.cnf configuration…

my.cnf

=================

[mysqld]

server-id=101

bind-address=192.168.0.159

datadir=/var/lib/mysql

socket=/var/lib/mysql/mysql.sock

log-error=/var/log/mysqld.log

pid-file=/var/run/mysqld/mysqld.pid

log_bin=mysql_bin_log

relay-log=/var/log/mysql_slave/relay-bin

replicate-do-table=i3.all_india_PO_list

replicate-do-table=i3.emp


Restore DB dump...

mysql -u root -p i3 -vv < /root/i3_final_bkp__111.sql


Setup replication….

mysql> CHANGE MASTER TO MASTER_HOST='192.168.0.158',MASTER_USER='repl', MASTER_PASSWORD='Lucknow@123', MASTER_LOG_FILE='mysql-bin.000002', MASTER_LOG_POS=3230, source_port=3306 ;


Start Stave 

mysql> start slave;


Check Replication Status 

mysql> show replica status \G

*************************** 1. row ***************************

             Replica_IO_State: Waiting for source to send event

                  Source_Host: 192.168.0.158

                  Source_User: repl

                  Source_Port: 3306

                Connect_Retry: 60

              Source_Log_File: mysql-bin.000002

          Read_Source_Log_Pos: 3230

               Relay_Log_File: relay-bin.000002

                Relay_Log_Pos: 1894

        Relay_Source_Log_File: mysql-bin.000002

           Replica_IO_Running: Yes

          Replica_SQL_Running: Yes

              Replicate_Do_DB:

          Replicate_Ignore_DB:

           Replicate_Do_Table: i3.all_india_PO_list,i3.emp

       Replicate_Ignore_Table:

      Replicate_Wild_Do_Table:

  Replicate_Wild_Ignore_Table:

                   Last_Errno: 0

                   Last_Error:

                 Skip_Counter: 0

          Exec_Source_Log_Pos: 3230

              Relay_Log_Space: 2546

              Until_Condition: None

               Until_Log_File:

                Until_Log_Pos: 0

           Source_SSL_Allowed: No

           Source_SSL_CA_File:

           Source_SSL_CA_Path:

              Source_SSL_Cert:

            Source_SSL_Cipher:

               Source_SSL_Key:

        Seconds_Behind_Source: 0

Source_SSL_Verify_Server_Cert: No

                Last_IO_Errno: 0

                Last_IO_Error:

               Last_SQL_Errno: 0

               Last_SQL_Error:

  Replicate_Ignore_Server_Ids:

             Source_Server_Id: 100

                  Source_UUID: b7efa411-d738-11ec-93b7-000c29dc1823

             Source_Info_File: mysql.slave_master_info

                    SQL_Delay: 0

          SQL_Remaining_Delay: NULL

    Replica_SQL_Running_State: Replica has read all relay log; waiting for more updates

           Source_Retry_Count: 86400

                  Source_Bind:

      Last_IO_Error_Timestamp:

     Last_SQL_Error_Timestamp:

               Source_SSL_Crl:

           Source_SSL_Crlpath:

           Retrieved_Gtid_Set:

            Executed_Gtid_Set:

                Auto_Position: 0

         Replicate_Rewrite_DB:

                 Channel_Name:

           Source_TLS_Version:

       Source_public_key_path:

        Get_Source_public_key: 0

            Network_Namespace:


Every thing looks great here.


Important Replication Commands...

To know the master position:- 

show master status \G

Output 

File: mysql_bin_log.000002

Position: 157

Binlog_Do_DB:

Binlog_Ignore_DB:

Executed_Gtid_Set:


Set Replication:-

CHANGE REPLICATION 
SOURCE TO 
SOURCE_HOST='source_ip_address',
SOURCE_PORT = port_num,
SOURCE_USER='replica_account_name', 
SOURCE_PASSWORD='REPLICA_PASSWORD', 
SOURCE_LOG_FILE='log_file_name', 
SOURCE_LOG_POS=log_position;


START REPLICA;

SHOW REPLICA STATUS \G;

STOP REPLICA;

RESET REPLICA;

Makes the replica forget its position in the source's binary log.

RESET REPLICA ALL;

Reset replication.

 Thank you for reading the blog till end.


 --By Abhishek Yadav...


Stay In Touch: