Showing posts with label Backup and Recovery. Show all posts

Jan 5, 2024

DB Backup and Restore History

 --DB Backup History

SELECT CONVERT(CHAR(100), SERVERPROPERTY('Servername')) AS Server,msdb.dbo.backupset.database_name,msdb.dbo.backupset.backup_start_date,msdb.dbo.backupset.backup_finish_date,msdb.dbo.backupset.expiration_date,CASE msdb..backupset.type WHEN 'D' THEN 'Database' WHEN 'L' THEN 'Log' WHEN 'I' THEN 'Diff'END AS backup_type, msdb.dbo.backupset.backup_size, msdb.dbo.backupmediafamily.logical_device_name, msdb.dbo.backupmediafamily.physical_device_name, msdb.dbo.backupset.name AS backupset_name, msdb.dbo.backupset.description FROM msdb.dbo.backupmediafamily INNER JOIN msdb.dbo.backupset ON msdb.dbo.backupmediafamily.media_set_id = msdb.dbo.backupset.media_set_id WHERE (CONVERT(datetime, msdb.dbo.backupset.backup_start_date, 102) >= GETDATE() - 30) and msdb.dbo.backupset.database_name like 'DB_Name'  order by 3 desc


--DB Restore History  

SELECT    [rh].[destination_database_name],     [rh].[restore_date],     [b].[backup_start_date],     [b].[backup_finish_date],     [b].[type],     [b].[first_lsn],     [b].[last_lsn],     [b].[checkpoint_lsn],     [b].[database_backup_lsn] FROM [msdb].[dbo].[restorehistory] AS [rh] JOIN [msdb].[dbo].[backupset] AS [b] ON [rh].[backup_set_id] = [b].[backup_set_id] WHERE [rh].[destination_database_name] = 'DB_Name' ORDER BY [rh].[restore_date] DESC;


======================================================================================================================

 --DB Backup 

--Full backup of DB_Name

BACKUP DATABASE [DB_Name] TO  

DISK = N'T:\DB_Backup\DB_Name\DB_Name_FULL_Backup_1.bak',  

DISK = N'T:\DB_Backup\DB_Name\DB_Name_FULL_Backup_2.bak',  

DISK = N'T:\DB_Backup\DB_Name\DB_Name_FULL_Backup_3.bak',  

DISK = N'T:\DB_Backup\DB_Name\DB_Name_FULL_Backup_4.bak',  

DISK = N'T:\DB_Backup\DB_Name\DB_Name_FULL_Backup_5.bak',  

DISK = N'T:\DB_Backup\DB_Name\DB_Name_FULL_Backup_6.bak',  

DISK = N'T:\DB_Backup\DB_Name\DB_Name_FULL_Backup_7.bak',  

DISK = N'T:\DB_Backup\DB_Name\DB_Name_FULL_Backup_8.bak',  

DISK = N'T:\DB_Backup\DB_Name\DB_Name_FULL_Backup_9.bak',  

DISK = N'T:\DB_Backup\DB_Name\DB_Name_FULL_Backup_10.bak'  

WITH NOFORMAT, NOINIT,  

NAME = N'DB_Name-Full Database Backup', SKIP, NOREWIND, NOUNLOAD, Compression, STATS = 1


--Diff backup of DB_Name


BACKUP DATABASE [DB_Name] TO  
DISK = N'T:\DB_Backup\DB_Name_Diff_Backup_1.bak',  
DISK = N'T:\DB_Backup\DB_Name_Diff_Backup_2.bak',  
DISK = N'T:\DB_Backup\DB_Name_Diff_Backup_3.bak'
WITH DIFFERENTIAL, NOFORMAT, NOINIT,  
NAME = N'Diff Backup', SKIP, NOREWIND, NOUNLOAD, compression, STATS = 10
GO


--T Log backup of DB_Name

BACKUP Log [DB_Name] TO  DISK = N'T:\DB_Backup\DB_Name_T_Log_Backup_1.trn' WITH NOFORMAT, NOINIT,  NAME = N'T:\DB_Backup\DB_Name-T_Log Database Backup', SKIP, NOREWIND, NOUNLOAD, compression, STATS = 1

GO


======================================================================================================================

Restarting a single Db 

use master

alter database YourDatabase

set offline

with rollback immediate

go


alter database YourDatabase

set online

go

Jul 21, 2022

Detach and Attach in SQL Server

Hello there, everyone! I hope everything is going well for you. Today, I'll show you about Detach and Attach

Detach SQL Server Database-

A SQL Server database is made up of at least two files: a data file (mdf) and a log file (ldf), though there may be additional data files in some circumstances. Since these files are attached to a SQL Server instance and the file system identifies them as open, moving them to another SQL Server instance requires more than a simple copy. Therefore, you can disconnect the pertinent database (files) from the SQL Server instance before relocating these files.

Detach a SQL Server Database Using SSMS-

Step 1- To detach a database, first right-click on it in SSMS and choose Tasks > Detach, as illustrated in the image below.


Fig.1

Step 2- Then, you will be taken to the following screen and click on Detach option and check the Drop connection box, select "OK".


Fig.2


In the above screen, there are two check boxes that you can use when detaching a database

Drop Connections -

Before the database may detach, there might be any active connections to the database that need to be closed. The disconnect will not work if there are any open connections to the database.

Update Statistics –

Before removing the database, this will update any stale statistics. Statistics will continue to be as they were at the time you separated the database if this option is left unchecked.

Step 3- In this case we will select only one as drop connection options as shown below and select OK.  After the detach occurs, the Status changes to Success.

Fig.3

Step 4- The database's data and log files will stay in the same file system location even after the database has been disconnected and is no longer visible in SSMS's Databases list.

SQL Server Attach Database with Log File-

After detaching the database using either of the methods above, the mdf, ldf and ndf (if exists, these are additional data files) need to be copied to the new location where you want to attach the database.

Attach a SQL Server Database Using SSMS-

Step 5- To attach the database, right click on Databases and select Attach... on the SQL Server instance where you want to attach the database.

Fig.4

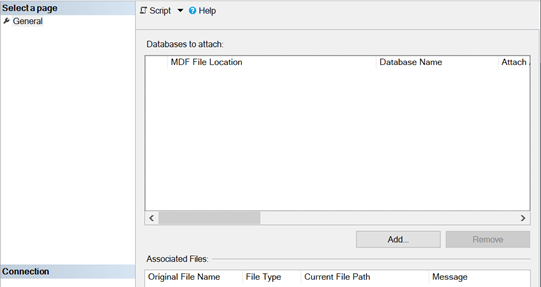
The following screen opens.

Fig.5

Step 6- To connect a mdf file, click the Add button, look for it, choose it, and then click OK.

Fig.6

Step 7- Once you select "OK," you can successfully attach a mdf and ldf file.

Jun 3, 2022

Step by Step Implementation of Instant File Initialization

 Hello guys, In this blog, I will discuss about step by step implementation of “Instant File Initialization" in SQL Server

STEP- 1: You must first open the instance in SSMS, then do the following query:

Fig-1

This is the result of executing a query:

Fig-2

You must update Y to N in the Instant _File Initialization _Enabled field.

To do so, simply follow the below steps:

STEP- 2: Open the instance using mstsc and search for "gpedit.msc" in the search box.

Go to Computer configuration -> Windows settings -> Security settings -> Local policies -> User Right Assignments -> Perform Volume Maintenance duties -> Double click -> Add User or group -> Advanced -> Find Now -> Service Account Name -> click  Apply and OK

Fig-3

Fig-4

STEP- 3: Using Configuration Manager, navigate to SQL Server Services and

restart SQL Server Services as directed below.

Fig-5

STEP- 4: Open SSMS again and run the STEP-1 query Again. As shown below, 

"Instant _File Initialization _Enabled" has changed from N to Y (No -> Yes)

Fig-6


May 22, 2022

Point-in-time recovery in SQL Server

 Hey guys, In this blog we will discussed about point-in-time recovery in SQL Server and how to perform it and also we discussed on full, differential and transaction log backup.

1.       Full backup – A Full backup is a complete backup of a database. The full backup contains all the  data in a database and can be used to do a complete restore of the database to the point-in-time that   the full backup completed, less than the uncommitted transaction in flight at that time. So, all files,  objects, tables are copied over to a secondary storage target each time. If you perform a full  backup once a day- then everything is copied over once a day.

2.      Differential backup – Differential backup makes a copy of files that have changed since the full  backup.

3.     Transaction Log backup – A transaction log backups copies the transaction log records off to a backup file. It helps to do a restore to a point-in-time other than full or differential backups are taken.

Point-in-time recovery in SQL Server

Point-in-time recovery allows to restore a database into a state it was in any point of time. This type of recovery is applicable only to databases that run under the full or bulk-logged recovery model.

Procedure to perform point-in-time recovery

STEP -1: First, you have to connect to your instance and open a new query window and write a syntax

Fig-1

STEP -2: Create a table and insert some data as shown below,

Fig-2 

STEP -3: Now, take a full backup  


Fig-3

STEP -4: After that insert some data for differential backup and note down the completion time.

Fig-4

STEP -5: Now, take a differential backup for above inserted data.


Fig-5

STEP- 6: Insert data for performing a log backup as shown below,

Fig-6

STEP- 7: Now take a log backup for above data and note down the completion date and time,


Fig-7

STEP-8: Now, execute a Syntax select *from emp_tbl to get the complete table as shown below,

Fig-8

STEP- 9: Now, drop the database so that you can restore a database because same database is already lies into the database.

Fig-9

 STEP- 10: Now restore a database till point of time.

                   First restore a full backup by using a syntax.


Fig-10

 STEP- 11: Now restore a differential backup by using a below syntax,

                     First restore a full backup with norecovery and then restore a differential backup with recovery


Fig-11

 STEP- 12: Now restore a log database by using a below syntax,

                  For this restore, you have to restore a full backup and differential backup with 

                  norecovery and than log backup with recovery.

Fig-12

STEP- 13: Now restore another log backup by using a below syntax,

Fig-13

STEP- 14: Now restore a database till point of time.

                    At point of time restore, you can restore the data at any period of time.   

Fig-14

STEP- 15: Result,

Fig-15