Showing posts with label Installation and Configuration. Show all posts

Jun 19, 2022

Steps to configure Hide DB Instance

Hey guys, In this blog I am going to explain you about "Hide DB Instance"

STEP -1: To begin, start SSMS and connect to the server.

 Click the drop-down menu in Server name and select <Browse for more>


 STEP -2: Expand Database Engine in Network Servers and look for any servers 
                 
                 connected to Database Engine, as shown below.

                 Now, if you want to hide this Server, go through the below procedures.


STEP -3: Type mstsc into the search box and select the server on which you want to 

                 Hide DB Instance.

      On a server, type SQL Server 2019 Network configuration in the search box. 


STEP -4: Go to SQL Server Network configuration -> Protocols for MSSQLSERVER -

                 > Right click -> Properties -> Flags -> Hide DB instance -> change it from 

                 No to Yes

                 Click Apply and Ok

STEP -5: Restart the SQL Server Services.


Jun 3, 2022

SQL Server Checkpoint and Lazy Writer

Good day, everyone! I hope you're doing well, and Today I'll show you how to use SQL Server's Checkpoint and Lazy Writer functions, as well as the many types of checkpoints available.

Checkpoint-

  • Checkpoint is an internal operation that writes all dirty (modified) pages from the Buffer Cache to the physical disc, as well as log entries from the log buffer to the physical file. Hardening of dirty pages is the process of writing dirty pages from the buffer cache to the data file.
  • It's a specialized process that SQL Server runs at predetermined times. SQL Server performs checkpoints for each database separately.
  • Checkpoint speeds up SQL Server recovery time in the case of an unexpected shutdown or system failure.
Fig.1


Advantages of Checkpoint-

  • It speeds up data recovery process.
  • Most of the DBMS products automatically checkpoints themselves.
  • Checkpoint records in log file is used to prevent unnecessary redo operations.
  • Since dirty pages are flushed out continuously in the background, it has very low overhead and can be done frequently.


Types of Checkpoints-

There are four different kinds of checkpoints in SQL Server.

  • Automatic checkpoint
  • Indirect checkpoint
  • Manual checkpoint
  • Internal checkpoint


Automatic checkpoint-

When SQL Server satisfies certain requirements linked to the recovery interval set in the server configurations, this is automatically executed in the background. For SQL Server, you can set the recovery interval at the instance level. If the database engine detects a write latency of more than 50 milliseconds, automatic checkpoints are throttled.

Here is the script to set the CHECKPOINT value to 30 seconds automatically.

EXEC sp_configure'recovery interval','30'

Indirect Checkpoint-

When any SQL Server database satisfies certain requirements relating to the recovery time interval provided in the database configuration, this is run in the background. For SQL Server, you can set the recovery interval at the database level. This is enabled by default for your database in SQL Server 2016, and the value is 1 minute.

Here's how to set the Indirect CHECKPOINT value to 60 seconds with a script.

 ALTER DATABASE CURRENT

SET TARGET_RECOVERY_TIME = 60 SECONDS

Manual Checkpoint-

When the user runs the CHECKPOINT command on any database, this is run. With the aid of additional parameter checkpoint duration, the user can enhance or decrease the performance of this procedure as desired.

The script to run manual CHECKPOINT can be found here.

 CHECKPOINT

Internal Checkpoint-

When SQL Server completes specific tasks such as backups, shutdown, or maintaining isolations, it automatically runs this command to ensure that the disc contains the same database as the log.

This intrinsic operation is not done by a script.

Lazy writer-

The lazy writer is a system procedure that removes infrequently used pages from the buffer cache to keep free buffers available. Dirty pages are written to disc first. The eager write process publishes filthy data pages associated with actions that are only weakly logged, such as bulk insert and select into.

May 18, 2022

Step by Step Configure Windows failover cluster on windows 2019

 Step by Step Configure Windows failover cluster on windows 2019-

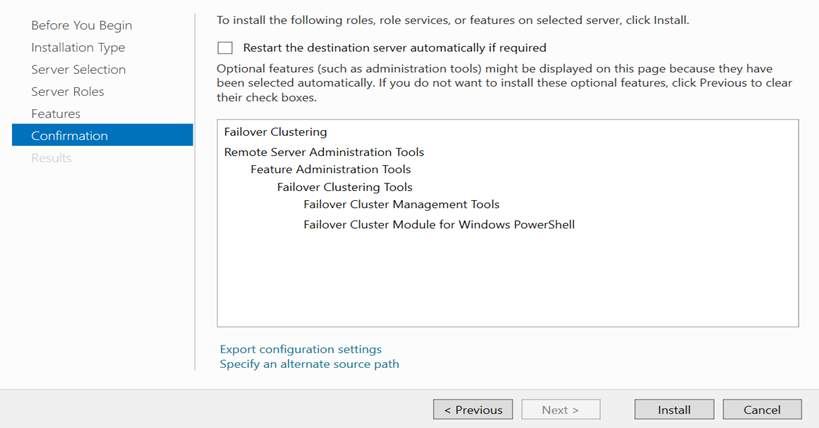
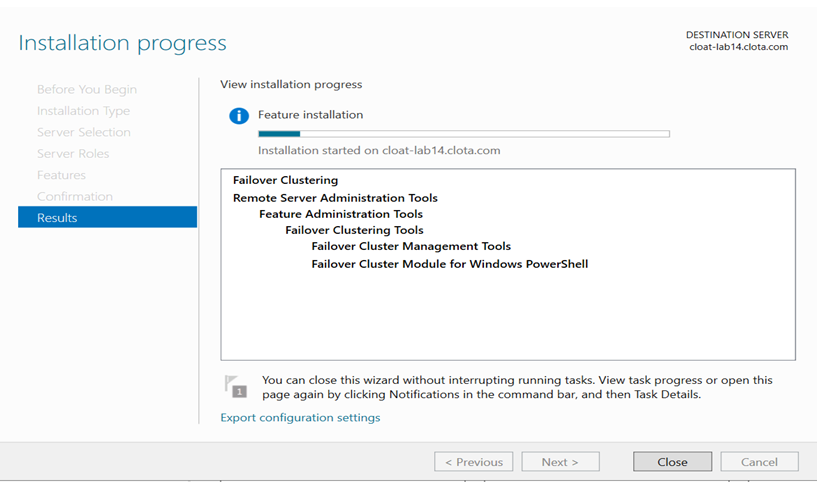
Step 1- First you need to login at the server and go to manage->add roles and features-> add failover clustering and install the features on the server and restart the server.

Fig.1


Fig.2


Fig.3


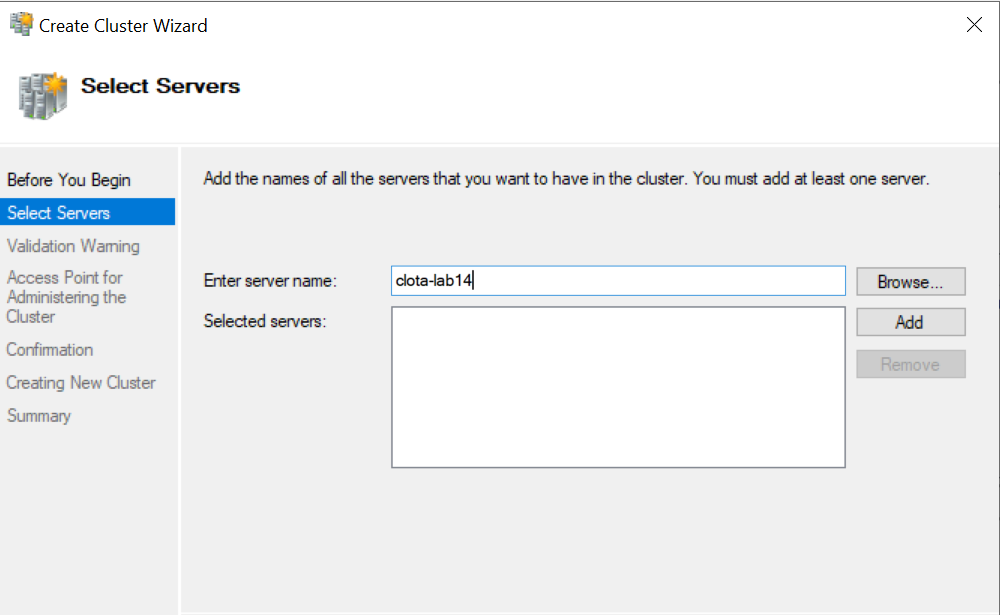
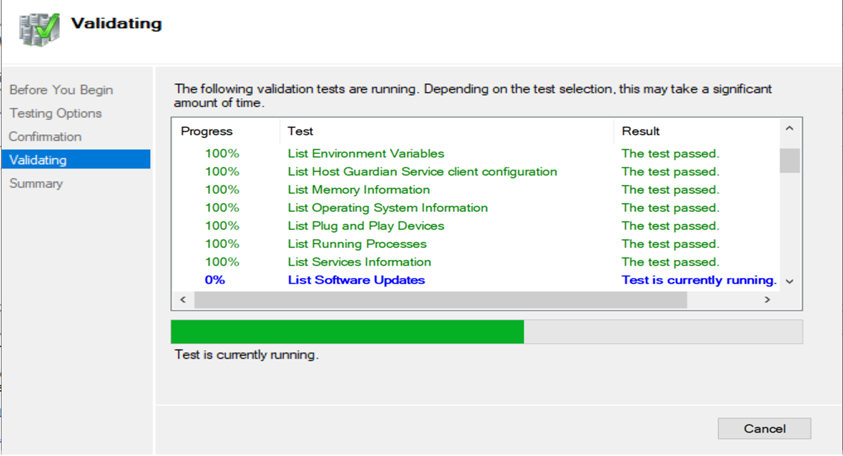
Step-2 Go to failover cluster manager-> create cluster->enter server name -> run all the tests-> enter cluster name -> ok

Fig.4


Fig.5


Fig.6


Fig.7


Step 3- Go to cluster name-> nodes -> right click-> add node-> enter your node name -> next-> run all the tests->finish it

Fig.8


Fig.9


Fig.10


Step 4-Now you have to see the both the server are in cluster.

Fig.11


 configure file share witness-

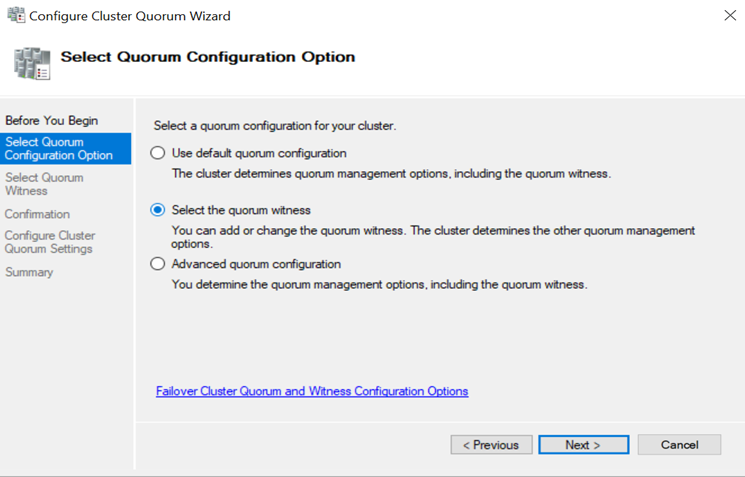
step 5- Go to cluster name->right click->more action->configure cluster quorum settings.

Fig.12


Step 6- Here, we want to select the quorum witness manually.

Fig.13


Step 7-Here select a quorum witness option and configure a file share witness and click on next.

Fig.14


Step 8- Now, Here just point to path and finish the wizard.

Fig.15


Step-9 Now, Here successfully configured the file share witness.

Fig.16


Step 10- Here you have to see the file share witness has successfully configure for the server lab 14 and lab 15.

Fig.17


Apr 29, 2022

STEP BY STEP SQL Server Installation

 Hey guys, in this blog I am going to explain you about Step by step New SQL server stand-alone installation

Minimum requirement for SQL server 2019 installation

Hardware requirements:

Hard disk - It requires a Minimum 6GB of available hard-disk space.

Monitor –  Super-VGA (800x600) or higher resolution monitor.

Memory –  Minimum:

                  Express editions: 512 MB

                  All other editions: 1 GB 

                  Recommended:

                  Express editions: 1 GB

                  All other editions: At least 4 GB and should be increased as database 

                  size increases to ensure optical performance.

Processor Speed – Minimum: x64 Processor: 1.4 GHz

                               Recommended: 2.0 GHz 0r faster 

Processor type – x 64 Processor: AMD Athlon 64, Intel Xeon with Intel EM64T support, Intel Pentium IV with EM64T support


Software Requirements:

Operating System: Windows 10 TH1 1507 or greater

                               Windows Server 2016 or greater

.NET Framework: Minimum operating systems includes minimum .NET framework.

STEP-1: Firstly, double click on a SQL server setup file(.exe) in your drive

               Go to SQL server installation and select New SQL server stand alone  

               installation or add features to an existing installation


STEP-2: In License Terms you have to read all the steps and than  accept the 

               license terms.

               click on Next >       


STEP-3: In feature selection, you have to select a feature for which you have to install.

               Here we are using it for Database Engine services

               Go to Feature selection and select Instance features Database Engine Services

               Click on Next >


STEP-4: In Instance configuration you have to select  either a Default instance or 

               Named instance.

               In Named instance you can select your own name.

               Here ,we are selecting  default instance 


STEP-5: Go to Server Configuration and put service account details like below,


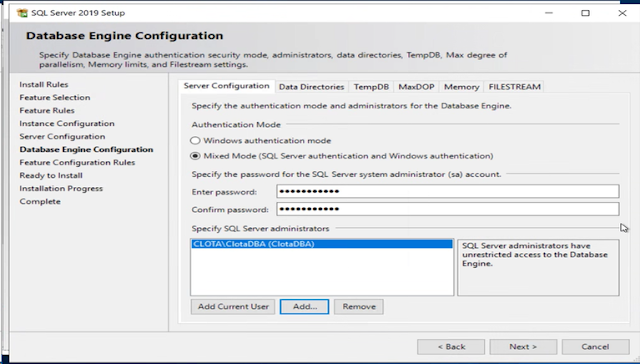
STEP -6: Go to Database Engine Configuration and select Server Configuration as 

                Mixed Mode and Enter  the password and add SQL Server administrators

                Click on Next > 


STEP-7: Go to Database Engine Configuration and select the Data Directoriesand 

               give the path as given below,

               Click on Next >


STEP-8: Go to Database Engine Configuration and select TempDB and Log Directory 

               as given below:

               Click on Next >


STEP-9: Go to MaxDOP and check Maximum degree of parellelism(MaxDOP)

                 By default it is 2 ,so Click on Next >


Step -10: In Memory , go with the default configuration values as given below,

                Click on Next >


Step-11: In FILESTREAM , go with the default configuration values as shown below,

              Click on Next >


STEP-12: Installation is in progress ,wait for few minutes.


 STEP-13: After Completing, click on close.


Just make sure you don't get any error in summary .txt file.


Step by Step implementing Log Shipping

Log Shipping enables you to automatically send transaction log backups from a primary database on a primary server instance to one or more secondary databases on separate secondary server instances. The transaction log backups are applied to each of the secondary databases individually. 


ADVANTAGES OF LOG SHIPPING- 

  1. Easy setup. 
  2. Standby databases can be available for read -only queries. 
  3. Low Maintenance.
  4. Multiple standby servers can be configured.
  5. Provide both disaster recovery and high availability solution. 
  6. It supports both bulk logged and full recovery model. 


DISADVANTAGES OF LOG SHIPPING- 

  1. It is possible to loss data when the main database is corrupt. 
  2. It only works at database level and not at SQL server instance level. 
  3. There will be data transfer latency.
  4. Failover take time. 
  5. No automatic failover.


 TYPES OF LOG SHIPPING -

In SQL Server two types of log shipping which are given below-:  

  1. Standby Mode 
  2. Restore Mode

Standby Mode-The database is available for querying and users can access it, but in read-only mode. 

Restore Mode- In this mode the database is not accessible.    


STEPS TO CONFIGURE LOG SHIPPING-

  • I have used SQL 2019 to set up Log Shipping.  
  • First, connect to your primary instance and select a database. 
  • Take a full back up from primary instance.  

  • Now connect to secondary server. 
  • Here, restore the full back up on the secondary server with the help of move command with norecovery.

  • Now, restore the log backup on the secondary server which we have taken from primary server. 
  • Now, configure log shipping between both the server and Go to primary server->Go to database->Right click->Go to properties->Transaction Log Shipping

  • Select network path and local path in transaction log shipping. 


  • Now, go to add and connect with initialize secondary server. 
  • Add the path for copied files. 
  • Go through standby mode which means you can read from secondary server.

  • Now, at primary server insert some data in a selected database. 
  • Go to SQL Server agent and start the LS backup job at the primary server. 

  • Now, go to secondary server and go to SQL Server agent and start the LS Copy and LS Restore job at the secondary server.   

  • Now, go to secondary server and open a new query window and write a query- 


  • It means the secondary server is totally shrink with primary server.

JOBS CREATED FOR LOG SHIPPING-

There are 3 types of jobs in log shipping as given below-   

  • Backup job (LS Backup)- A SQL Server Agent job that performs the backup operations, logs history to the local server and the monitor server and deletes old backup file and history information. 
Go to SQL Agent->Jobs->LS Backup job

  • Copy job (LS Copy)A SQL Server Agent job that copies the backup files from primary server to a configurable destination on the secondary server and logs history on the secondary server and the monitor server. 


                                       Go to SQL Agent->Jobs->LS Copy job


  • Restore job (LS Restore)- A SQL Server Agent job that restores the copied backup file to the secondary database. 
Go to SQL Agent->Jobs->LS Restore job