Hey guys, in this blog I am going to explain to you about Oracle Connectivity and Networking.
Oracle
Connectivity and Networking-
Oracle
Connectivity and Networking in Oracle Database 19c refers to the set of
features and technologies that enable communication between various Oracle
Database system components, such as clients, servers, and other
database-related elements. In a distributed database system, this networking
and connectivity architecture is critical for facilitating data access, transfer,
and communication. It includes a number of protocols, tools, and configurations
that work together to enable safe, efficient, and dependable communications
between database clients and the Oracle Database server.
Configure the Oracle
Instance's Listener-
Step 1 - Connect to an Oracle instance
and navigate to the Oracle home directory. Using the cd command, navigate to
another directory and then to the bin directory. Finally, launch netmgr. (Net
Manager)

Step 2 – Open Net Manager.

Step 3 – Go with Listener option
and create new listener

Step 4 – Type Listener name.

Step 5 – Add an address, choose
a listening location, and provide a port number.

Step 6- Select the Service name.
make a new service for listener.

Step 7 – Enter the name of the
network service and select TCP/IP Protocol.
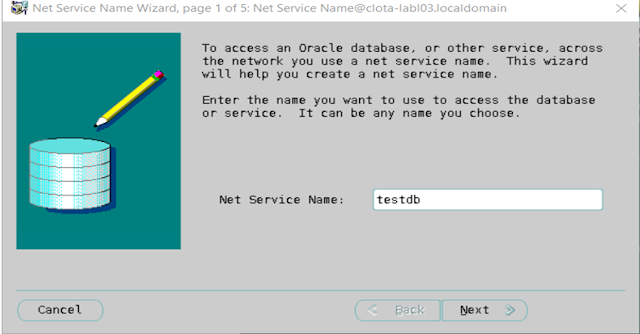

Step 8 - Enter hostname and port
no for particular service name.

Step 9 - Enter the Service Name
and the connection type database default, then click Finish.


Step 10 – Save the Network
Configuration file.

Step 11 – Start the Listener and
then check the status of the Listener.
Syntax-
lsnrctl start listener name.
lsnrctl status listener name.


Step 12 – Check how many
databases are operating on the Oracle instance, then create the environment,
name the databases, and connect to the Oracle instance.
Syntax-
Ps -ef|grep pmon
. oraenv
Testdb
Sqlplus
/ as sysdba.

Step 13- Alter the system
setting for local listener for a certain host, service ID, and port number and
alter the register also.
Syntax-
alter system set
local_listener='(DESCRIPTION=(ADDRESS=(PROTOCOL=tcp)(HOST=192.168.0.160)(PORT=1535)))'
sid='testdb' scope=spfile;

Step 14- After that, the
instance will be terminated and restarted.
Syntax-
Shutdown immediate;
Startup;

Step 15- Then ping the service
name for the specific listener.
Syntax-
tnsping service name

Step 16 - Using the cd command,
navigate to the admin directory and type ls to view the configuration file.

Step 17 – If you know how many
listeners are on the run.
Syntax-
More tnsnames.ora
More listener.ora


Step 18- Connect the Oracle
instance. once again Create a new user and provide the new user authority to
create sessions and tables.
Syntax-
Sqlplus / as sysdba
Create user user name identified by
password;
Grant create session, create table to
user;

Step 19- Provide a limitless
quota for certain tablespace users and insert record and commit it.
Syntax-
Alter user user name quota unlimited in
users;
Insert into username.tablename value
(id , ‘name’);


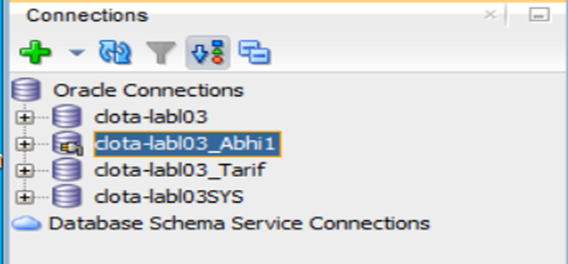
Step 20 – Open SQL Developer and
connect using the new user we created, such as Abhi1.

Step 20 – We can now connect to
SQL developer using the Abhi1 user.
Step 21- Now from SQL developer
Select the data from the table and insert one more record and again select it.
Syntax-
Select * from table name;
Insert into tablename (id , ‘name’);

Step 22 – When connecting as a
new user to an Oracle instance with service name using Linux.
Syntax-
Username/Username@servicename.

No comments:
Post a Comment
If you have any doubt or question, please contact us.